How to Replace a Cabin Filter for Clean Air in Your Car?
Keeping the air in your car clean is vital for health and comfort. A crucial component in this process is the Cabin Filter. Studies show that indoor air quality can be two to five times worse than outdoor air. This highlights the importance of ensuring that your vehicle's cabin air remains fresh and free from pollutants.
Replacing the Cabin Filter is a simple task that can greatly improve air quality inside your car. Research indicates that a clean cabin filter can filter out up to 99% of dust, allergens, and other harmful particles. Many car owners neglect this vital maintenance step, leading to subpar air quality. This can cause sneezing, coughing, and other allergy-related issues when driving.
It’s important to check your cabin filter regularly, especially if you travel in urban areas. A clogged filter can restrict airflow and make your air conditioning system less effective. Sometimes, you might even forget when the last replacement was made. Recognizing this oversight can lead to better health and enjoyment on the road. Taking the time to replace your Cabin Filter opens the door to clearer, cleaner air.
Understanding the Importance of Cabin Air Filters in Your Vehicle
Cabin air filters play a vital role in maintaining air quality inside your vehicle. They filter out pollutants, dust, and allergens. When these filters become clogged, the air you breathe gets compromised. This can lead to health issues, especially for those with allergies or respiratory problems.
Regularly inspecting and replacing your Cabin Air Filter is essential. Many people forget about it, thinking it's unimportant. However, a clean filter helps with HVAC system efficiency and keeps the air fresh. Neglecting this maintenance can lead to unpleasant odors and reduced visibility due to foggy glass.
Consider the environment you drive in. If you live in an urban area, the filter may clog faster. Over time, a dirty filter can force your system to work harder, leading to higher energy consumption. Don't overlook this small part; its impact is significant. Make it a habit to check and replace your cabin filter regularly. Your health and comfort on the road depend on it.
Identifying the Right Cabin Filter for Your Car Model
When replacing a cabin filter, knowing your car model is essential. Different vehicles have varying filter sizes and specifications. Checking your owner’s manual can offer great insight into which filter fits your car. This document often includes the part number and filter type needed for a successful replacement.
It's also helpful to refer to online forums or community groups specific to your vehicle model. Enthusiasts often share their experiences and recommendations about the best filters. You might discover some hidden gems that are not widely advertised.
Tips: Always remember that not all filters are created equal. Some may offer better filtration and longevity than others. When in doubt, invest in a quality option. Research before purchasing; it can save you money and time. Don't overlook the installation process, either. Sometimes, the fit isn't perfect, and adjustments may be required.
Choosing the right filter can be an imperfect journey. You might buy the wrong size or type. Don't hesitate to consult local mechanics for their opinion. Their insights might lead you to the right choice. A little effort now ensures cleaner air in your car later.
Tools Needed for Replacing a Cabin Air Filter
Replacing a cabin air filter is essential for maintaining clean air inside your vehicle. To do this task effectively, certain tools are necessary. A flathead screwdriver, for example, can help remove any clips or cover panels. Additionally, a vacuum cleaner with a brush attachment can assist in cleaning around the filter area. Many forget to gather their tools before starting. This step can lead to frustration during the replacement process.
Data from the American Lung Association indicates that cabin air filters can reduce harmful pollutants by up to 50%. However, the effectiveness relies on proper replacement practices. A pair of gloves is wise to protect your hands from dust and debris. Some users find it helpful to have a flashlight for better visibility when inspecting the filter location. Often, engine compartments can be cramped and dark, making it hard to see what you're doing.
Many car owners overlook the frequency of filter changes. The recommendation usually stands at every 15,000 miles, but this varies based on driving conditions. Dusty or polluted environments may require more frequent replacements. Having the right tools at hand can simplify the procedure. Yet, many still procrastinate or misplace items, causing delays. It’s essential to pay attention and stay organized for a smooth replacement experience.
Step-by-Step Guide to Removing the Old Cabin Filter
Replacing a cabin filter is essential for maintaining clean air in your car. A clogged filter can severely reduce air quality. According to the Environmental Protection Agency (EPA), indoor air can be two to five times more polluted than outdoor air. The same can apply to your car's interior.
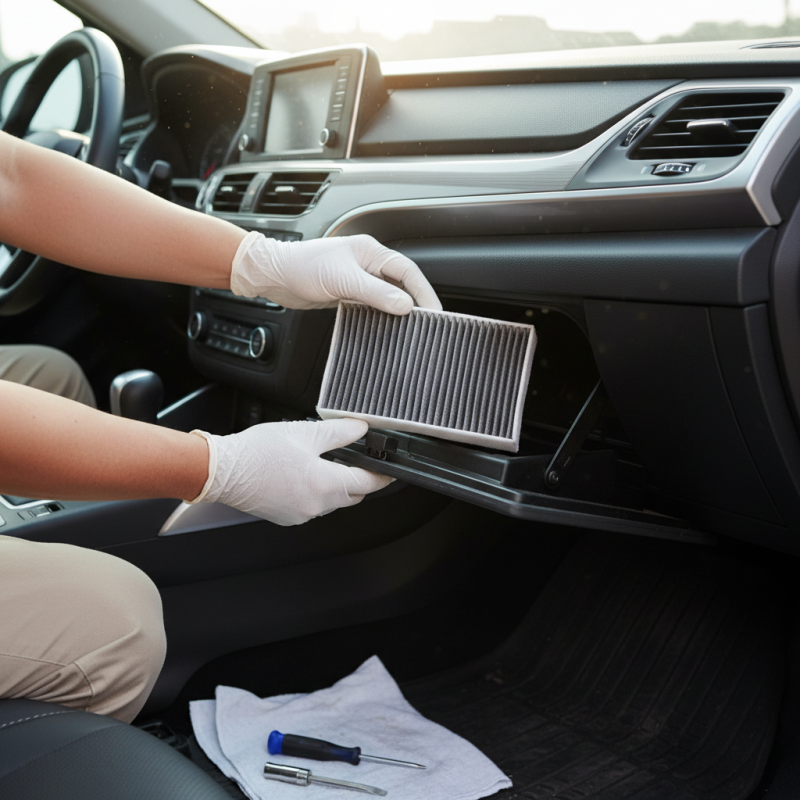
Begin the process by locating the cabin filter compartment, often found behind the glove box. Clear out any items from the glove box for easy access. Unscrew or unclip it carefully. This step is often overlooked. Many drivers miss this, leading to unnecessary complications later.
Once the glove box is out of the way, remove the old filter. Pay attention to how it was positioned. Noting the airflow direction is crucial for installing the new filter correctly. You might find dirt and debris stuck in the compartment, which could affect air quality. Clean this area gently before placing the new filter in. A common mistake is neglecting this cleaning step. Simple details like this can significantly impact the air you breathe in your vehicle.
Installing the New Cabin Filter and Ensuring Proper Fit
Replacing a cabin filter is essential for a clean air experience in your car. To ensure a proper fit during installation, start by choosing the right filter size. Many filters come with instructions, so read carefully. Remove any old filter remnants to avoid air leaks.
Tips: Check the filter's orientation before installation. Incorrect placement can lead to reduced airflow. It might be confusing when dealing with various designs, so take a moment to study the new filter.
After placing the new filter, make sure it fits snugly. Check for any gaps around the edges. An ill-fitting filter allows dust and allergens to enter. Double-check the assembly. It's easy to overlook small details, which can cause bigger issues later.
Lastly, regularly inspect your cabin filter. Even a new filter can become clogged sooner than expected. A simple visual check can save you from unexpected problems down the line. So, keep an eye on it!
How to Replace a Cabin Filter for Clean Air in Your Car? - Installing the New Cabin Filter and Ensuring Proper Fit
| Step | Description | Time Required | Tools Needed |
| 1 | Locate the cabin filter compartment, usually behind the glove box. | 5 minutes | None |
| 2 | Remove any screws or clips securing the glove box. | 10 minutes | Screwdriver |
| 3 | Pull down the glove box to access the cabin filter. | 5 minutes | None |
| 4 | Carefully remove the old cabin filter, noting its orientation. | 5 minutes | None |
| 5 | Insert the new cabin filter, ensuring it fits properly. | 5 minutes | None |
| 6 | Reattach the glove box and any fasteners removed. | 5 minutes | Screwdriver |
| 7 | Test the ventilation system to ensure proper airflow. | 5 minutes | None |